Create a Django Cookiecutter
See a list of the steps below to get up get your Django Cookiecutter Project up and running fast.
Note
This method allows you to create many django-cookiecutter projects without the need to re-create the virtual environments.
For example, a new user may want to generate several projects trying different options.
More advanced users may choose a different way to structure their virtual environments.
Pre-requisites
Python 3.8 or greater installed on your computer.
Tutorial
Navigate to the folder you wish to create your django-cookiecutter.
Here we are using projects.
dev@aps-dev:~/projects$
Create a Virtual Environment
Select the tab for your preferred Operating System.
Note
The commands to create a virtual environment below will use the default Python version in your Operating System.
If you prefer another python version installed on your computer, you can replace python3.12 with python3.n, where n is the version number.
Activate Virtual Environment
Ensure you are in the same folder as my_env. In this example, we are in the projects folder. Use the following command for your Operating System to activate the virtual environment.
After activating the virtual environment, your cli will look something like this, identifying the name of the virtual environment at the start.
(my_env) dev@aps-dev:~/projects$
Create Your Django Project
In your projects folder, use the following command.
cookiecutter https://github.com/imAsparky/django-cookiecutter
Cookiecutter will ask questions to set your package up. If you’re unsure or don’t know what to enter, stick with the defaults.
See Reference-Inputs for more details about the django-cookiecutter project options.
An Example Django Project
  (my_env) dev@aps-dev:~/projects$ cookiecutter https://github.com/imAsparky/django-cookiecutter
  author_name [Mark Sevelj]:
  email [mark@example.com]:
  github_username [imAsparky]:
  github_user_email [mark@example.com]:
  project_name [Django Boilerplate]: My New Django
  git_project_name [my-new-django]:
  project_slug [my_new_django]:
  project_short_description [A Django project with all the boilerplate]: An example Django Project for django-cookiecutter
  version [0.1.0]:
  ALLOWED_HOSTS []: www.example.com (NON-DEFAULT)
  INTERNAL_IPS []:
  LANGUAGE_CODE [en]:
  LANGUAGES [en, hi]:
  TIME_ZONE [UTC]:
  Select USE_I18N:
  1 - True
  2 - False
  Choose from 1, 2 [1]:
  SITE_ID [1]:
  Select deploy_with_docker:
  1 - n
  2 - y
  3 - swarm
  Choose from 1, 2, 3 [1]:
  Select use_pre_commit:
  1 - y
  2 - n
  Choose from 1, 2 [1]:
  Select create_conventional_commits_edit_message:
  1 - y
  2 - n
  Choose from 1, 2 [1]:
  Select use_GH_custom_issue_templates:
  1 - y
  2 - n
  Choose from 1, 2 [1]:
  Select automatic_set_up_git_and_initial_commit:
  1 - y
  2 - n
  Choose from 1, 2 [1]:
  Select create_repo_auto_test_workflow:
  1 - y
  2 - n
  Choose from 1, 2 [1]:
  Select use_GH_action_semantic_version:
  1 - y
  2 - n
  Choose from 1, 2 [1]:
  Select include_sphinx_docs:
  1 - y
  2 - n
  Choose from 1, 2 [1]:
  Select use_readthedocs:
  1 - y
  2 - n
  Choose from 1, 2 [1]:
  Select include_documentation_templates:
  1 - y
  2 - n
  Choose from 1, 2 [1]:
  Select include_how_to_contribute_template:
  1 - y
  2 - n
  Choose from 1, 2 [1]:
  Select include_contributor_covenant_code_of_conduct:
  1 - y
  2 - n
  Choose from 1, 2 [1]:
  Select use_repo_status_badge:
  1 - no
  2 - concept
  3 - wip
  4 - active
  Choose from 1, 2, 3, 4 [1]: 2  (NON-DEFAULT)
  Select use_pyup_io:
  1 - y
  2 - n
  Choose from 1, 2 [1]:
  Select open_source_license:
  1 - MIT license
  2 - BSD license
  3 - ISC license
  4 - Apache Software License 2.0
  5 - GNU General Public License v3
  6 - Not open source
  Choose from 1, 2, 3, 4, 5, 6 [1]: 2  (NON DEFAULT)
  (my_env) dev@aps-dev:~/projects$
Hint
See below, notice the project_name format and how django-cookiecutter automatically formats the name for your GitHub repository and python module as default inputs.
project_name [Django Boilerplate]: My New Django
git_project_name [my-new-django]:
project_slug [my_new_django]:
Folder Structure
If you have been following along the Tutorial order, your directory structure will look something similar to this.
projects
  ├── my-new-django
  │   ├── .env
  │   │   ├── .local
  │   │   ├── .production
  │   │   ├── .staging
  │   │   └── .testing
  │   ├── .git
  │   ├── CHANGELOG.md
  │   ├── LICENSE.rst
  │   ├── README.rst
  │   ├── config
  │   │   ├── requirements
  │   │   │   ├── base.txt
  │   │   │   ├── local.txt
  │   │   │   ├── production.txt
  │   │   │   ├── staging.txt
  │   │   │   └── test.txt
  │   │   └── settings
  │   │       ├── __init__.py
  │   │       ├── base.py
  │   │       ├── local.py
  │   │       ├── production.py
  │   │       ├── staging.py
  │   │       ├── test.py
  │   │       └── username_blacklist.py
  │   ├── docs
  │   │   ├── Makefile
  │   │   ├── __init__.py
  │   │   ├── build
  │   │   ├── make.bat
  │   │   ├── requirements.txt
  │   │   └── source
  │   ├── manage.py
  │   ├── my_new_django
  │   │   ├── __init__.py
  │   │   ├── asgi.py
  │   │   ├── urls.py
  │   │   └── wsgi.py
  │   ├── users
  │   │   ├── __init__.py
  │   │   ├── admin.py
  │   │   ├── apps.py
  │   │   ├── forms.py
  │   │   ├── migrations
  │   │   │   └── __init__.py
  │   │   ├── models.py
  │   │   └── views.py
  │   ├── pytest.ini
  │   ├── requirements_dev.txt
  │   └── templates
  │       └── account
  │
  └── my_env
      ├── bin
      ├── include
      ├── lib
      ├── lib64 -> lib
      └── pyvenv.cfg
Install Django
Change directory to your new django project, the one containing manage.py.
cd my-new-django
Install Django into your virtual environment.
Note
Ensure you are in the root folder, the one containing manage.py
pip install -r requirements_dev.txt
Check new packages installed into your virtual environment.
pip freeze
You will see something similar to this in your CLI.
alabaster==0.7.12
arrow==1.2.1
asgiref==3.4.1
attrs==21.2.0
Babel==2.9.1
backports.entry-points-selectable==1.1.1
beautifulsoup4==4.10.0
binaryornot==0.4.4
certifi==2021.10.8
cffi==1.15.0
cfgv==3.3.1
chardet==4.0.0
charset-normalizer==2.0.8
click==8.0.3
cookiecutter==1.7.3
cryptography==36.0.0
defusedxml==0.7.1
distlib==0.3.4
dj-inmemorystorage==2.1.0
Django==4.0
django-allauth==0.47.0
django-debug-toolbar==3.2.4
django-debug-toolbar-template-profiler==2.0.2
django-environ==0.8.1
docutils==0.17.1
execnet==1.9.0
filelock==3.4.0
furo==2021.11.23
identify==2.4.0
idna==3.3
imagesize==1.3.0
iniconfig==1.1.1
Jinja2==3.0.3
jinja2-time==0.2.0
markdown-it-py==1.1.0
MarkupSafe==2.0.1
mdit-py-plugins==0.3.0
myst-parser==0.16.1
nodeenv==1.6.0
oauthlib==3.1.1
packaging==21.3
platformdirs==2.4.0
pluggy==1.0.0
poyo==0.5.0
pre-commit==2.16.0
py==1.11.0
pycparser==2.21
Pygments==2.10.0
PyJWT==2.3.0
pyparsing==3.0.6
pytest==6.2.5
pytest-django==4.5.2
pytest-forked==1.4.0
pytest-reverse==1.3.0
pytest-xdist==2.5.0
python-dateutil==2.8.2
python-slugify==5.0.2
python3-openid==3.2.0
pytz==2021.3
PyYAML==6.0
requests==2.26.0
requests-oauthlib==1.3.0
six==1.16.0
snowballstemmer==2.2.0
soupsieve==2.3.1
Sphinx==4.3.2
sphinx-copybutton==0.4.0
sphinx_inline_tabs==2021.4.11b9
sphinxcontrib-applehelp==1.0.2
sphinxcontrib-devhelp==1.0.2
sphinxcontrib-htmlhelp==2.0.0
sphinxcontrib-jsmath==1.0.1
sphinxcontrib-qthelp==1.0.3
sphinxcontrib-serializinghtml==1.1.5
sqlparse==0.4.2
tblib==1.7.0
text-unidecode==1.3
toml==0.10.2
tox==3.24.4
urllib3==1.26.7
virtualenv==20.10.0
wrapt==1.13.3
Create Django Secret Environment Variable
In settings.py, the Django secret key configuration is in an environment variable. See below.
# SECURITY WARNING: keep the secret key used in production secret!
SECRET_KEY = os.environ("DJANGO_SECRET_KEY")
Create a Django Secret key.
python -c 'from django.core.management.utils import get_random_secret_key; print(get_random_secret_key())'
You will see an output similat to this.
w#5cb$au3$t+hyj(f7ejgrk7$xet7_q@8m)5qd*c_*)nl1shwr
Danger
DO NOT USE THE NO LONGER A SECRET, SECRET KEY GENERATED HERE.
Copy and add the secret key to an environment variable.
export DJANGO_SECRET_KEY='w=#5cb$au3$t+hyj(f7ejgrk7$xet7_q@8m)5qd*c_*)nl1shwr'
printenv DJANGO_SECRET_KEY # To check it worked
w#5cb$au3$t+hyj(f7ejgrk7$xet7_q@8m)5qd*c_*)nl1shwr
export DJANGO_SECRET_KEY='w=#5cb$au3$t+hyj(f7ejgrk7$xet7_q@8m)5qd*c_*)nl1shwr'
printenv DJANGO_SECRET_KEY # To check it worked
w#5cb$au3$t+hyj(f7ejgrk7$xet7_q@8m)5qd*c_*)nl1shwr
Right-click the Computer icon and choose Properties, or in Windows Control Panel, choose System.
Choose Advanced system settings.
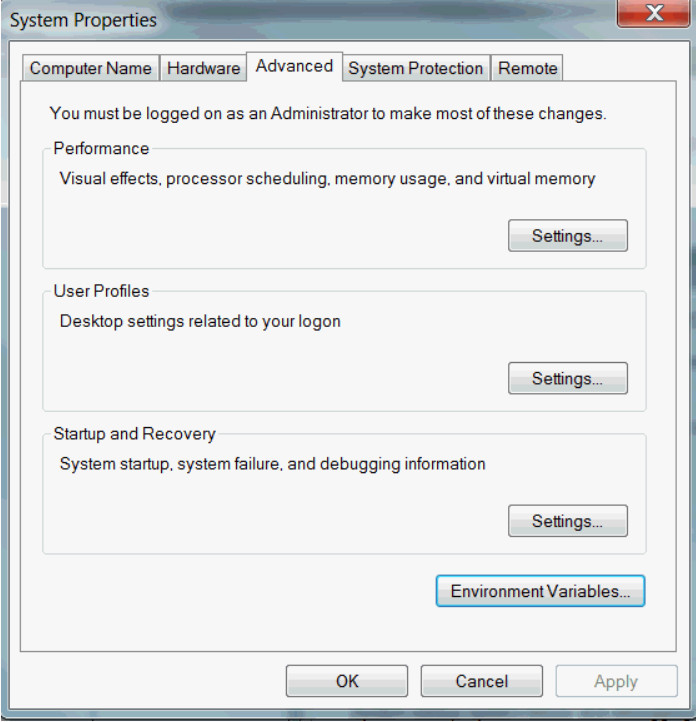
On the Advanced tab, click Environment Variables.
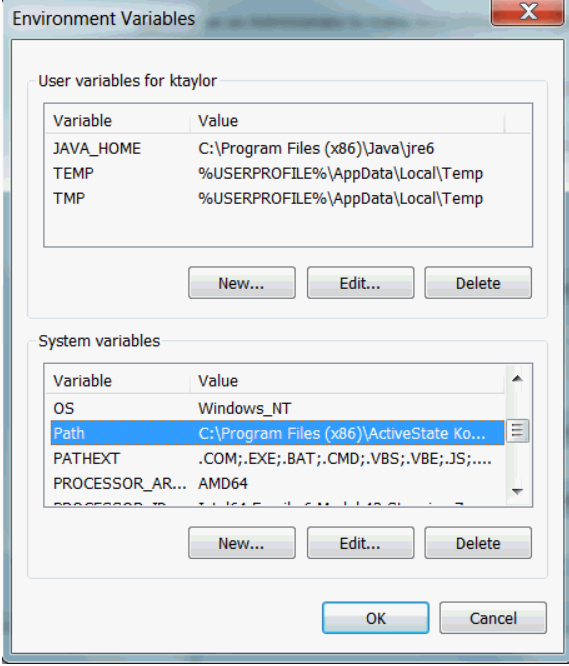
Click New to create a new environment variable.
After creating or modifying the environment variable, click Apply and then OK to have the change take effect.
Note
The graphical user interface for creating environment variables may vary slightly, depending on your version of Windows.
Before Initial Migration
Important
You may wish to make some changes to the Custom User model before making your initial migration.
For example, you can change the default user types to suit your application.
See How-to Custom User for customisation options before your initial migration.
Final Project Setup
Here we use the default DB SQLite database shipped with Django.
In the root directory, the one with the manage.py file, type the following commands.
python3 manage.py collectstatic --no-input
You will see something similar to this in your CLI.
128 static files copied to '/projects/my-new-django/static'
python3 manage.py makemigrations
You will see something similar to this in your CLI.
 Migrations for 'account':
  /projects/my-new-django/venv/lib/python3.12/site-packages/allauth/account/migrations/0004_alter_emailaddress_id_alter_emailconfirmation_id.py
    - Alter field id on emailaddress
    - Alter field id on emailconfirmation
Migrations for 'socialaccount':
  /projects/my-new-django/venv/lib/python3.12/site-packages/allauth/socialaccount/migrations/0005_alter_socialaccount_id_alter_socialapp_id_and_more.py
    - Alter field id on socialaccount
    - Alter field id on socialapp
    - Alter field id on socialtoken
python3 manage.py migrate
You will see something similar to this in your CLI.
Operations to perform:
  Apply all migrations: account, admin, auth, contenttypes, sessions, sites, socialaccount
Running migrations:
  Applying contenttypes.0001_initial... OK
  Applying auth.0001_initial... OK
  Applying account.0001_initial... OK
  Applying account.0002_email_max_length... OK
  Applying account.0003_auto_20211008_0148... OK
  Applying admin.0001_initial... OK
  Applying admin.0002_logentry_remove_auto_add... OK
  Applying admin.0003_logentry_add_action_flag_choices... OK
  Applying contenttypes.0002_remove_content_type_name... OK
  Applying auth.0002_alter_permission_name_max_length... OK
  Applying auth.0003_alter_user_email_max_length... OK
  Applying auth.0004_alter_user_username_opts... OK
  Applying auth.0005_alter_user_last_login_null... OK
  Applying auth.0006_require_contenttypes_0002... OK
  Applying auth.0007_alter_validators_add_error_messages... OK
  Applying auth.0008_alter_user_username_max_length... OK
  Applying auth.0009_alter_user_last_name_max_length... OK
  Applying auth.0010_alter_group_name_max_length... OK
  Applying auth.0011_update_proxy_permissions... OK
  Applying auth.0012_alter_user_first_name_max_length... OK
  Applying sessions.0001_initial... OK
  Applying sites.0001_initial... OK
  Applying sites.0002_alter_domain_unique... OK
  Applying socialaccount.0001_initial... OK
  Applying socialaccount.0002_token_max_lengths... OK
  Applying socialaccount.0003_extra_data_default_dict... OK
  Applying socialaccount.0004_auto_20211008_0148... OK
python3 manage.py createsuperuser # Follow the prompts
Username (leave blank to use 'default'): <enter your name>
Username (leave blank to use 'default'):
Email address: <enter your email>
Password:
Password (again):
This password is too short. It must contain at least 8 characters.
This password is too common.
Bypass password validation and create user anyway? [y/N]: y
Superuser created successfully.
Run the Tests
Your project comes complete with a test suite for the custom user.
Tox, the test runner is configured to test locally with Python 3.8, 3.9 and 3.10.
See the following commands for options.
tox
tox -e py10

or

tox -e py11

or

tox -e py3.12
You will see something similar to this in your CLI.
platform linux -- Python 3.10.1, pytest-6.2.5, py-1.11.0, pluggy-1.0.0 -- /projects/my-new-django/.tox/py38/bin/python
cachedir: .tox/py38/.pytest_cache
django: settings: config.settings.test (from ini)
rootdir: /projects/my-new-django, configfile: pytest.ini
plugins: reverse-1.3.0, forked-1.4.0, xdist-2.5.0, django-4.5.2
[gw0] linux Python 3.10.1 cwd: /projects/my-new-django
[gw1] linux Python 3.10.1 cwd: /projects/my-new-django
[gw0] Python 3.10.1 (default, Nov 26 2021, 20:14:08)  -- [GCC 9.3.0]
[gw1] Python 3.10.1 (default, Nov 26 2021, 20:14:08)  -- [GCC 9.3.0]
gw0 [6] / gw1 [6]
scheduling tests via LoadScopeScheduling

tests/test_custom_user.py::test_create_superuser_errors_raised_ok
[gw0] [ 16%] PASSED tests/test_custom_user.py::test_create_superuser_errors_raised_ok
tests/test_custom_user.py::test_create_superuser_ok
[gw0] [ 33%] PASSED tests/test_custom_user.py::test_create_superuser_ok
tests/test_custom_user.py::test_create_user_errors_raised_ok
[gw0] [ 50%] PASSED tests/test_custom_user.py::test_create_user_errors_raised_ok
tests/test_custom_user.py::test_create_user_is_superuser_ok
[gw0] [ 66%] PASSED tests/test_custom_user.py::test_create_user_is_superuser_ok
tests/test_custom_user.py::test_create_user_is_staff_ok
[gw0] [ 83%] PASSED tests/test_custom_user.py::test_create_user_is_staff_ok
tests/test_custom_user.py::test_create_user_ok
[gw0] [100%] PASSED tests/test_custom_user.py::test_create_user_ok

================================= PASSES ==================================
_________________ test_create_superuser_errors_raised_ok___________________
[gw0] linux -- Python 3.10.1 projects/my-new-django/.tox/py38/bin/python
-------------------------- Captured stderr setup --------------------------
Creating test database for alias 'default'...
------------------------ Captured stderr teardown -------------------------
Destroying test database for alias 'default'...
============================ 6 passed in 1.19s ============================
_________________________________ summary _________________________________
  py38: commands succeeded
  congratulations :)
Run Your Project
Django comes with a development server. This server provides all the features needed to view your Django project locally; however, it is not suitable for a production environment.
To view your project in the browser, type the following command.
python3 manage.py runserver # In your browser 127.0.0.1/admin
You will see something similar to this in your CLI.
Performing system checks...

System check identified no issues (0 silenced).
December 28, 2021 - 03:49:48
Django version 4.0.0, using settings 'config.settings.local'
Starting development server at http://127.0.0.1:8000/
Quit the server with CONTROL-C.
In your browser, navigate to http://127.0.0.1:8000/admin and log in with the superuser credentials you have created.
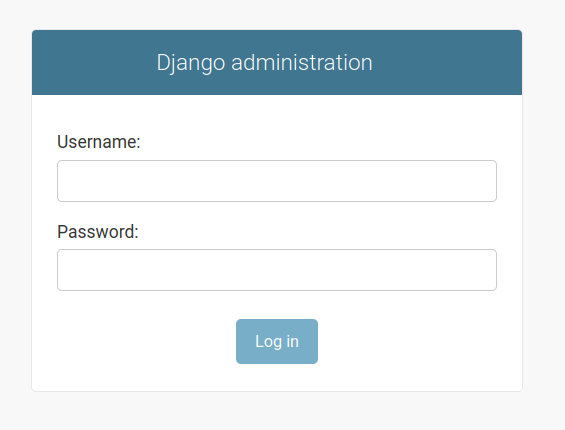
Congratulations, you have created your new Django project.
Troubleshooting
The website wont run
Check config/settings/local.py contains:
ALLOWED_HOSTS = ["127.0.0.1"]
The tests wont run
You are getting an error message that psycopg2 won’t be installed.
Psycopg2 is the most popular PostgreSQL database adapter for the Python programming language.
psycopg2 is the default PostgreSQL adaptor used in django-cookiecutter. psycopg2 has some dependencies to be built from source, and on occasion, these may not be available on some people’s computers.
An alternative, the psycopg2-binary package, is available for beginners to start using Python and PostgreSQL; however, this package is not suitable for production.
Navigate to /config/requirements/test.txt, and you should see something like the code below.
Comment line 3 and uncomment line 4. This action will select the option to use psycopg2-binary.
 1coverage==6.2
 2dj-inmemorystorage==2.1.0
 3psycopg2==2.9.3 # This version should be used in production
 4# psycopg2-binary  # This version is ok for Development and Testing
 5pytest==6.2.5
 6pytest-django==4.5.2
 7pytest-reverse==1.3.0
 8pytest-xdist==2.5.0
 9tblib==1.7.0
10tox==3.24.5
Whats next?
or you can
Check out our other Tutorials for more information on how to get the most out of your django-cookiecutter package.